(Continued from the previous blog) As soon as I turned on the power, an astonishingly loud noise erupted, so I quickly switched it off. I inspected all the circuits, but there was no mistake in the setup. I concluded that the loud noise was likely due to testing with the transformer’s core left unsealed, causing the strong magnetic field to produce intense vibrations and sound. I realized that I should properly weld the cut section of the core before testing again. However, welding it would make it difficult to address any issues if a defect was found, so I decided to try turning on the power switch once more. This time, I was prepared for the loud noise. I flipped the power switch on… and once again, a thunderous crash resounded, just as before. But familiarity is a strange thing; once you’re mentally prepared, any action feels manageable.
The voltmeter connected to the secondary coil showed the expected 4 volts, so I thought, “Alright! Success,” feeling satisfied. I then used a DC welder (which I had modified to run on DC, also self-made) to weld the cut sections of the transformer core, securing them tightly in a vise. Both welds were completed successfully. This homemade spot welder was made using a juice press base that was previously constructed from a log cut from a large oak tree in the garden. I initially built it to press grapefruit juice, as we have an abundance of grapefruits each year. However, it became unnecessary when my eldest daughter sent a high-performance juicer from the United States.
I welded the transformer core and secured both units to the base with screws. With this, 60% of the work was complete. Now, all that remained was to secure the wiring with cable ties and, most importantly, to create the electrodes. After fixing the two transformers in place, I noticed that the secondary coil seemed a bit cramped. To improve insulation, I thought it best to create some space between the coil and the core, so I inserted a wooden block against the wire and tapped it with a hammer to create a small gap. Now, it was time for the final check. Suppressing my excitement, I carefully double-checked the wiring and flipped the switch for the third time. This time, a low humming sound filled the air—satisfying, but oddly, the voltmeter only showed 2 volts instead of the expected 4 volts. Just as I thought, “That’s strange,” a large amount of smoke began rising from the transformer. It turned out later that the secondary coil had contacted the core in two spots, inadvertently creating a short circuit.
When I hammered the secondary coil, it damaged the insulation, causing the coil to contact the core and creating a complete short circuit. Regaining focus, I cut the welded core open again, removed the secondary coil, and used a large burner to burn off the insulation tape and paint. Reflecting on the inadequate insulation, I decided to cover the coil with heat shrink tubing, which I picked up at a nearby electronics store. It’s rare for things to go perfectly on the first try; clear mistakes and unexpected failures are part of the process. Ultimately, a positive outlook, coupled with persistence and trial and error, is what leads to success.
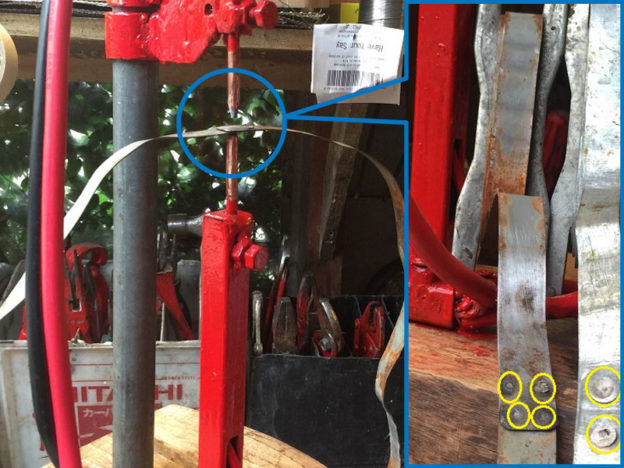
This welder ultimately worked well and proved useful for repairing cut metal strips. Compared to repairs done with rivets, spot welding allows for nearly instant repairs, making it a valuable tool. However, there is still room for improvement in terms of usability. In the image, the cut metal strip on the right has been repaired by securing it with rivets at two points marked with yellow circles. The strip on the left has been spot-welded at four points, with the rust removed and repainted for reuse. Spot welding only takes 1–2 seconds, making it an extremely efficient method.
(متابعة للمدونة السابقة)
ما إن قمتُ بتشغيل التيار حتى دوّى صوت هائل بشكل مفاجئ، فسارعتُ إلى إيقافه فورًا. قمتُ بفحص جميع الدوائر بعناية، ولم أجد أي خطأ في التوصيلات. عندها خلصتُ إلى أن هذا الضجيج العنيف ناتج على الأرجح عن اختبار المحوّل بينما كان قلبه المعدني مقطوعًا وغير مُغلق، مما تسبب في اهتزازات قوية وصوت مرتفع بفعل المجال المغناطيسي الشديد. أدركتُ أنه ينبغي لحام الجزء المقطوع من القلب أولًا قبل إعادة الاختبار. غير أن لحامه في هذه المرحلة سيجعل من الصعب معالجة أي خلل محتمل لاحقًا، لذلك قررتُ تشغيل مفتاح الطاقة مرة أخرى.
هذه المرة، كنتُ مستعدًا نفسيًا للصوت. ضغطتُ على مفتاح التشغيل… وإذا بالضجيج المدوي يتكرر تمامًا كما في المرة السابقة. لكن الغريب أن الاستعداد الذهني يغيّر الإحساس بالأمور؛ فعندما تكون مهيأً، يصبح كل شيء أسهل احتمالًا.
أظهر مقياس الجهد المتصل بالملف الثانوي قيمة 4 فولت كما هو متوقع، فقلت في نفسي: «حسنًا! لقد نجح الأمر»، وشعرتُ بالرضا. بعد ذلك، استخدمتُ آلة لحام تعمل بالتيار المستمر (قمتُ بتعديلها بنفسي أيضًا) للحام الجزء المقطوع من قلب المحوّل، مع تثبيته بإحكام في ملزمة. تمّ اللحام بنجاح من الجهتين.
هذا الجهاز المنزلي للحام النقطي صُنع باستخدام قاعدة مكبس عصير كنتُ قد بنيتها سابقًا من جذع شجرة بلوط كبيرة في الحديقة. في الأصل، صنعتُها لعصر الجريب فروت، إذ نملك وفرة منه كل عام، لكنها أصبحت غير ضرورية بعد أن أرسلت لي ابنتي الكبرى عصّارة عالية الأداء من الولايات المتحدة.
بعد لحام قلب المحوّل، قمتُ بتثبيت كلا المحوّلين على القاعدة بواسطة البراغي. وبهذا، كان نحو 60٪ من العمل قد اكتمل. لم يتبقَّ سوى تثبيت الأسلاك باستخدام أربطة الكابلات، والأهم من ذلك، تصنيع الأقطاب الكهربائية.
وبعد تثبيت المحوّلين، لاحظتُ أن الملف الثانوي كان ضيقًا بعض الشيء. ولتحسين العزل، رأيتُ أنه من الأفضل خلق مسافة صغيرة بين الملف والقلب المعدني. أدخلتُ قطعة خشبية بجانب السلك وطرقتها بالمطرقة برفق لتشكيل فجوة بسيطة.
حان وقت الفحص النهائي. كتمتُ حماسي وأعدتُ التحقق من جميع التوصيلات بعناية، ثم شغّلتُ المفتاح للمرة الثالثة. هذه المرة، انبعث صوت طنين منخفض ومطمئن. لكن المفاجأة كانت أن مقياس الجهد أظهر 2 فولت فقط بدلًا من 4 فولت. وبينما كنتُ أفكر: «هذا غريب»، بدأ دخان كثيف يتصاعد من المحوّل. اتضح لاحقًا أن الملف الثانوي كان قد لامس القلب المعدني في نقطتين، مما أدى إلى حدوث قصر كهربائي كامل.
عندما قمتُ بطرق الملف، تضرر العزل، فتلامس السلك مع القلب المعدني. استعدتُ تركيزي، وقطعتُ اللحام مرة أخرى، وأخرجتُ الملف الثانوي، ثم استخدمتُ موقدًا كبيرًا لإزالة شريط العزل والطلاء. وبسبب قصور العزل السابق، قررتُ تغطية الملف بأنبوب عزل حراري قابل للانكماش، اشتريته من متجر إلكترونيات قريب.
نادرًا ما تسير الأمور على نحو مثالي من المحاولة الأولى. فالأخطاء الواضحة والإخفاقات غير المتوقعة جزء لا يتجزأ من أي عملية ابتكار. وفي النهاية، فإن النظرة الإيجابية، مقرونة بالمثابرة وروح التجربة والخطأ، هي ما يقود إلى النجاح.
وفي المحصلة، أثبتت آلة اللحام هذه كفاءتها، وكانت مفيدة للغاية في إصلاح الشرائط المعدنية المقطوعة. وبالمقارنة مع الإصلاح باستخدام المسامير، يتيح اللحام النقطي إصلاحًا شبه فوري، ما يجعله أداة عالية القيمة. ومع ذلك، لا يزال هناك مجال لتحسين سهولة الاستخدام.
في الصورة، يظهر الشريط المعدني على اليمين وقد تم إصلاحه باستخدام مسمارين عند النقطتين المميزتين بالدوائر الصفراء. أما الشريط على اليسار، فقد تم لحامه نقطيًا في أربع نقاط، ثم أزيل الصدأ وأعيد طلاؤه ليُستخدم من جديد. لا يستغرق اللحام النقطي سوى ثانية إلى ثانيتين، ما يجعله وسيلة فعّالة للغاية وعالية الكفاءة.